Introduction
In this post, we set up a RaspberryPi to play music via Spotify Connect.
Prerequisites
- A Spotify Premium account
- A RaspberryPI (I uses a RaspberryPi 2 model B), including:
- SDCard
- WiFi Dongle or Ethernet cable
- Speakers (with audio jack plug)
Overview
We will first flash a standard image for the RaspberryPi. But we will make custom configurations to connect to a Network or WiFi and set up SSH to allow for remote administration.
Flashing the image
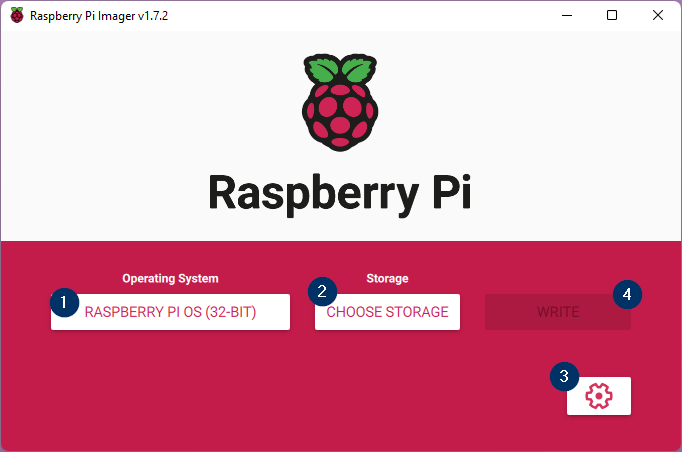
First, plug in your SDCard. Then, get the Raspberry Pi Imager from the official website. Once downloaded and install, select an image (1), I used the recommended image.
The next step is to select a storage (2). Be VERY careful with this. If you select the wrong storage, you might overwrite another storage drive!
Before clicking the WRITE button (4), click on the cogwheel in the lower right corner (3). This will show you advanced configurations. Set the options appropriate to you. If you enable WiFi, you should obviously have a WiFi dongle compatible with the Raspberry Pi.
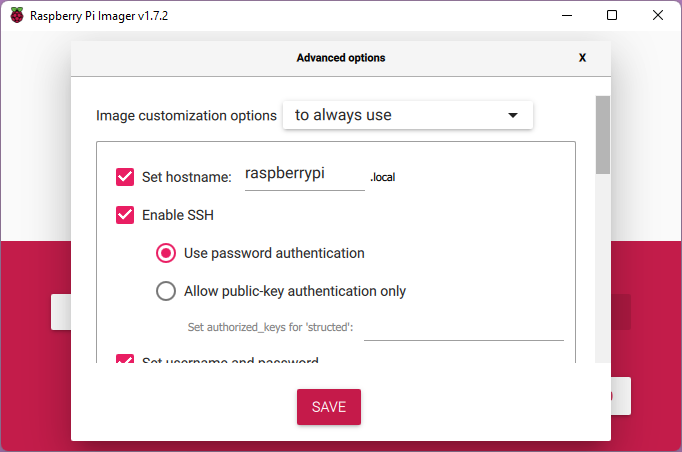
If you enable SSH, and you put the RaspberryPi in the same network as another machine, you can then use SSH to administer it. So you don't have to set up a display and keyboard!
Once you set your options, exit the dialog and click "WRITE".
Booting & initial set-up
Plugin in the power for your RaspberryPi and wait a bit for it to boot.
Then, use ssh to log in. On a Windows 11 machine with Windows Terminal, you don't even need to install additional tools. You can just use SSH from the Terminal!
If you changed user, hostname and or port in the image configuration before flashing the image, please make sure to use these!
Mine would look like this, where structed is my username and raspberrypi the hostname:
ssh structed@raspberrypi.local
The first logon may take a bit.
Updating the system
Once logged in, fire up the configuration tool. Type:
sudo raspi-config
Navigate to update and select it to update your system - this will take a while.
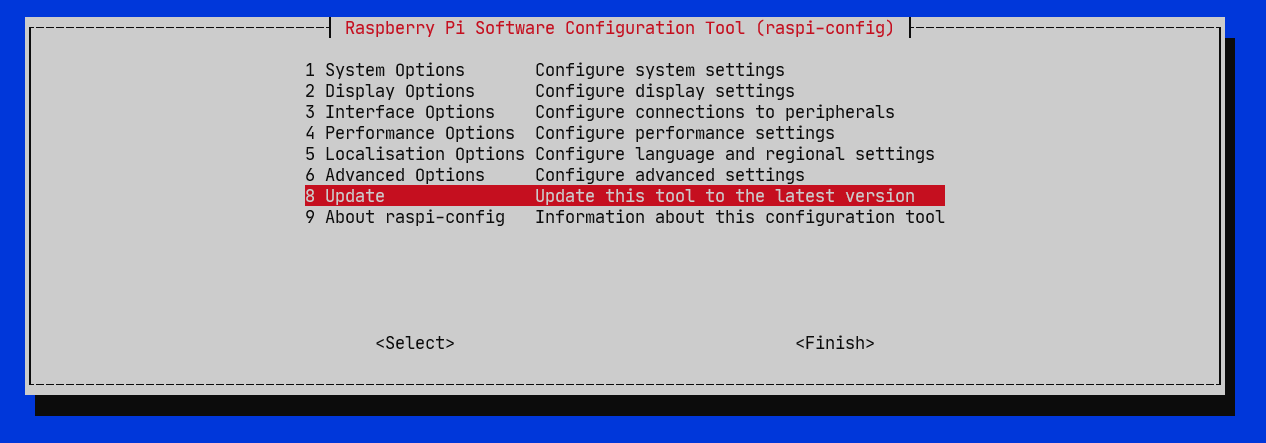
Once the update is complete, raspi-config will automatically restart.
You can now make additional changes, or close it.
Disable Desktop UI
If you're like me, you may want to disable the graphical desktop interface to save resources, as I will only run the RaspberriPi without a display.
Still in raspi-config, choose System Options.
In the next menu, choose Boot / Auto Login.
In the last menu, I chose Console Autologin Text console, automatically logged in as '<username>' user (where <username> is your username)
Once you're done configuring, exit with the Finish option in the raspi-config or press ESC until you exit to shell.
Installing spotifyd
spotifyd is a daemon that runs on the Raspberry Pi. It is used to connect to Spotify and play music.
Installing spotifyd allows us to play Spotify music on this device controlled by any other Spotify Connect enabled device. So once setup, we can control it e.g. from a phone.
For the setup, we'll essentially follow the official spotifyd installation instructions for RaspberryPi:
- Go to the Releases page and download the latest release (in my case, my architecture is
armhffor RaspberryPi 2): (spotifyd-linux-armhf-default.tar.gz) as well as the sha51 filespotifyd-linux-armhf-default.tar.gz
wget https://github.com/Spotifyd/spotifyd/releases/download/v0.3.3/spotifyd-linux-armhf-default.tar.gzwget https://github.com/Spotifyd/spotifyd/releases/download/v0.3.3/spotifyd-linux-armhf-default.sha512
Verify the integrity of the downloaded file:
sha512sum -c spotifyd-linux-armhf-default.sha512- If the download was OK, it will show this output:
spotifyd-linux-armhf-default.tar.gz: OK
Extract the
spotifyd-linux-armhf-default.tar.gzfile to the/opt/spotifyddirectory:tar -xzf spotifyd-linux-armhf-default.tar.gz -C /usr/bin/
Create the systemd service file:
Depending whether you want to run as root or as the logged in user, the steps would be a bit different. I want to run as my
structeduser, so I'll use the following steps. IF you want to go for root, check the docs.- Create the systemd user config directory:
mkdir -p ~/.config/systemd/user/ - Create the systemd config file:
nano ~/.config/systemd/user/spotifyd.service - Paste the contents of the spotifyd.service from the
spotifydrepository. - Save the file.
- Create the systemd user config directory:
Configure
spotifyd:- Create the config directory:
mkdir ~/.config/spotifyd/ - Create the config file:
nano ~/.config/spotifyd/spotifyd.conf
Please change the values for
username,password,device_name![global] username = "USER" password = "PASS" backend = "alsa" device = "hw" # Given by `aplay -L` mixer = "PCM" volume-controller = "softvol" # or alsa_linear, or softvol #onevent = command_run_on_playback_event device_name = "rpi-kids" bitrate = 320 cache_path = "cache_directory" volume-normalisation = true normalisation-pregain = -10You might also want to reduce the
bitrate(160or96) and/or change the volumevolume-controller.For more information on the config file, like how you can work around storing your password in the config file, see the documentation.
- Create the config directory:
Reload the daemon:
systemctl --user daemon-reload
Testing spotifyd
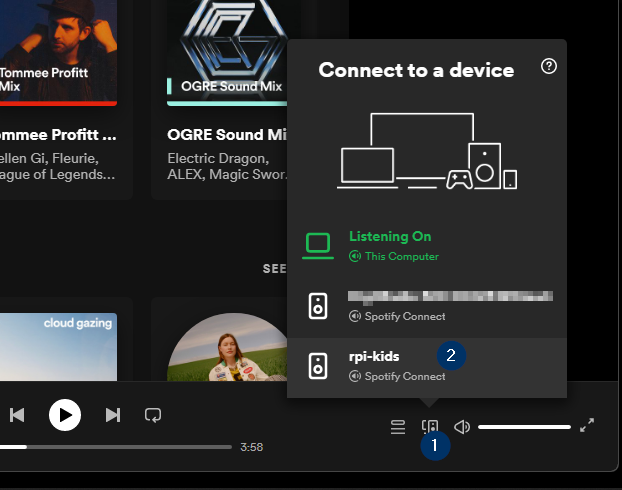
Run /usr/bin/spotifyd --no-daemon to test spotifyd. Once started, use another device, like your mobile phone, and open Spotify. There, click the "loudspeaker" button (1) to select the device. In my case, it's raspi-kids (2).
Then click play!
If you have a device plugged in to your headphone jack on the RaspberryPi, you should now hear the music play!
Installing the systemd daemon
First, we start the daemon again, as we want to use the daemon instead of calling the binary from the terminal, which blocks input. And it would nto survive a reboot, anyways.
systemctl --user start spotifyd.service
However, for the service to restart and be kept alive upon reboot, we have to issue these commands:
sudo loginctl enable-linger <username>
systemctl --user enable spotifyd.service
The first command is required to enable your user to run long-running services. Without it systemd would kill the spotifyd process as soon as you log out, and only run it when you log in. Now spotifyd is always running on the Pi, so you can use it as a listening device remotely!
Conclusion
We set up a RaspberryPi for remote administration, so we never require a display or keyboard.
We then set up spotifyd to play music on the RaspberryPi, and we can control it from a phone or another device with the Spotify app.