Windows BitLocker with a TPM
I wanted to use my private PC for work, but never actually did it because I would have had to join Microsoft's Azure Active Directory and get GPOs pushed on my private machine. Not gonna happen.
However, I recently discovered you can now just link a Work Account and only get some requirements pushed that make sense whether you use it for work or not.
Among them, was enabling BitLocker.
BitLocker
BitLocker encrypts your hard drives. But You need a means of providing it a secret. Those include:
- Password
- USB-Key (e.g. YubiKey)
- Trusted Platform Module (TPM)
- Various combination of TPM + PIN/Password/USB-Key
Usability
As I enabled BitLocker, I had neither a YubiKey nor a TPM, so I was forced to use a Password. The process of setting it up the first time is super easy if you use a Password. However, I had to enter it on each boot.
This was super annoying because:
- You cannot select the keyboard layout - it's fixed to
en-GB- This affects your password, so it takes a few times to find one that is easy to type and aligns with password policy
- I constantly forgot about the fact that I would have to enter a password on boot. I would walk away to get a coffee - only to come back to a powered-off machine because it hit the wait timeout on password prompt.
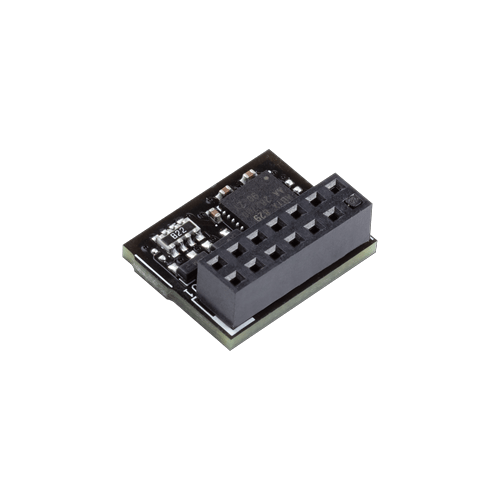
Buying a TPM
This meant, I had to get a TPM expansion for my mainboard.
There are various TMP standards, the most recent one is 2.0. Pretty much all modern PCs should have TPM 2.0 by now.
Also, please be aware, that there are various extension module standards on the market, even from the same vendor.
For example, my ASUS TUF Gaming X570-PLUS mainboard uses TPM-SPI, and I first bought a TMP-M module.
Enabling the TPM Extension
 After inserting the module, I made sure TPM is enabled in my BIOS.
I also checked in the Windows Device Manager that there are no problems
After inserting the module, I made sure TPM is enabled in my BIOS.
I also checked in the Windows Device Manager that there are no problems
Using the TPM with BitLocker
First, I checked if I could find an obvious way of removing the password and enabling the TPM at the same time. I imagined, I would have to de-crypt and then re-encrypt my hard drives if I did it sequentially.
I could not find the right way to do that in the UI, so I went to the CLI and after a bit of googling, found out what to do. It can all be done with the manage-bde command.
Here's the help output for reference:
❯ manage-bde -help
    BitLocker Drive Encryption: Configuration Tool version 10.0.19041
    Copyright (C) 2013 Microsoft Corporation. All rights reserved.

    manage-bde[.exe] -parameter [arguments]

    Description:
        Configures BitLocker Drive Encryption on disk volumes.

    Parameter List:
        -status     Provides information about BitLocker-capable volumes.
        -on         Encrypts the volume and turns BitLocker protection on.
        -off        Decrypts the volume and turns BitLocker protection off.
        -resume     Resumes encryption, decryption, or free space wipe.
        -lock       Prevents access to BitLocker-encrypted data.
        -unlock     Allows access to BitLocker-encrypted data.
        -autounlock Manages automatic unlocking of data volumes.
        -protectors Manages protection methods for the encryption key.
        -SetIdentifier or -si
                    Configures the identification field for a volume.
        -ForceRecovery or -fr
        -changepassword
                    Modifies password for a data volume.
        -changepin  Modifies PIN for a volume.
        -changekey  Modifies startup key for a volume.
        -KeyPackage or -kp
        -upgrade    Upgrades the BitLocker version.
        -WipeFreeSpace or -w
                    Wipes the free space on the volume.
        -ComputerName or -cn
                    Runs on another computer. Examples: "ComputerX", "127.0.0.1"
        -? or /?    Displays brief help. Example: "-ParameterSet -?"
        -Help or -h Displays complete help. Example: "-ParameterSet -h"
    Examples:
        manage-bde -status
        manage-bde -on C: -RecoveryPassword -RecoveryKey F:\
        manage-bde -unlock E: -RecoveryKey F:\84E151C1...7A62067A512.bek
1. Get the status:
❯ manage-bde -status c:
BitLocker Drive Encryption: Configuration Tool version 10.0.19041
Copyright (C) 2013 Microsoft Corporation. All rights reserved.

Volume C: []
[OS Volume]

    Size:                 237,86 GB
    BitLocker Version:    2.0
    Conversion Status:    Fully Encrypted
    Percentage Encrypted: 100,0%
    Encryption Method:    XTS-AES 128
    Protection Status:    Protection On
    Lock Status:          Unlocked
    Identification Field: Unknown
    Key Protectors:
        Numerical Password
        Password
2. Adding TPM
So, let's first add the TPM, to avoid re-encrypting:
❯ manage-bde -protectors c: -add -tpm
BitLocker Drive Encryption: Configuration Tool version 10.0.19041
Copyright (C) 2013 Microsoft Corporation. All rights reserved.

Key Protectors Added:

ERROR: An error occurred (code 0x803100ac):
Oh no! This did not work. What a helpful error code! 🙄
So, ok, I'm gonna jump the hoop and re-rencrypt...
3. Removing the Password
❯ manage-bde -protectors -delete c: -type Password
BitLocker Drive Encryption: Configuration Tool version 10.0.19041
Copyright (C) 2013 Microsoft Corporation. All rights reserved.

Volume C: []
Key Protectors of Type Password

    Password:
      ID: {6571552B-01EA-4B85-A987-067676DCD575}

Key protector with ID "{6571552B-01EA-4B85-A987-067676DCD575}" deleted.
Yay!
4. Actually add the TPM
❯ manage-bde -protectors c: -add -tpm
BitLocker Drive Encryption: Configuration Tool version 10.0.19041
Copyright (C) 2013 Microsoft Corporation. All rights reserved.

Key Protectors Added:

    TPM:
      ID: {2C84B95A-C1FA-4DE7-8997-3FF40B439DE9}
      PCR Validation Profile:
        7, 11
        (Uses Secure Boot for integrity validation)
Shutdown!
I believe on my machine, reboot did not trigger the password, so I shut down and started "cold". Indeed, I never saw the password prompt on boot again!
Turns out, this approach did not lead to a noticeable re-encrypt - success!
Header Photo by ASUS